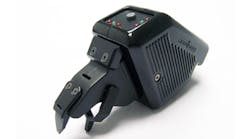
ORIGIN TECHNOLOGIES CORPORATION’s HS722 off-the-shelf contour measurement system is a handheld laser profiling system, the smallest available in the LaserGauge® product line. The HS722 USB sensor is specifically designed for inspecting and measuring small features in hard-to-access areas. Applications include edge radius, break angles, chamfering angle and length, gap/flush, step height, and other measurements where accessibility to the feature is limited.
As with the other LaserGauge USB sensors, a high-resolution imager captures the 2D surface profile and transfers it to a PC or to the LG1200 controller for processing and display.
The HS722 is the smallest, most compact sensor in the LaserGauge product offering. The removable standoff guides the user for correct alignment to ensure accurate measurement. The sensor’s small size, light weight, reduced footprint and narrow tapered stem gives it access to highly restricted areas.
With a horizontal scanning resolution of 0.0003 in. and a depth accuracy of ±0.0005 in., the sensor can be used to measure the smallest of features.
The HS722 is currently available only in a 0.40 in. field-of-view (FOV) model.
A Windows™ based software program, LGCommander, is used to configure the sensor and run the algorithm. Scans are displayed in real time and can be saved automatically. Setups, user rights and operational preferences can be safeguarded under passwords, and certification of the gauge for a specific application can be managed through the software.
Applications include measuring the break edge on corners of jet engine parts to within established maximum and minimum tolerances of flight-worthiness. Operators also can evaluate weld surface characteristics; stamped radii; gap/step/angle of various parts; pitting on critical surfaces, like turbine blades; or scratches and gouges on tubes, pipes and other surfaces.
“The HS722 is our smallest sensor to date and is perfect for measuring edge radius, break angles, chamfer angles and other small features in hard-to-reach areas,” according to Ken Creekmore, Origin Technologies co-founder. “The HS722 sensor is so compact, it fits in the palm of your hand. Weighing only 6.5 ounces, the smaller size also reduces operator fatigue”.
www.origintech.com
