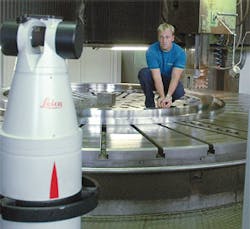
The Otto Junker Group is generally known as a furnace builder, but its foundry in Simmerath- Lammersdorf, Germany, specializes in stainless and specialty steel castings. Its core products are large-scale components for machines used in chemical, pharmaceutical and food production. “Turned components are in great demand,” explained fabrication shop Ulrich Tigges. “We use turning mills capable of machining castings up to 6.30 meters in diameter.”
Until 2007, the foundry used conventional measuring instruments to verify dimensional standards, such as calipers or micrometer screw gauges. But, handling 6-m-diameter castings while using these tools is a complex task: the measuring equipment requires continuous attention and its accuracy must be maintained. Additionally, some shapes cannot be measured by conventional means, for example the radii and sloping surfaces that overlap. In those cases, diameters are theoretical dimensions of sections that do not exist on the casting and must be construed during measurement.
Faced with this situation, Otto Junker managers decided to measure dimensions directly on the turning machine using state-of-the-art, software-controlled coordinate metrology. The machined castings have to comply with the tightest of tolerances. “The ranges of accuracy we are dealing with here are quite incredible,” added Tigges. “Formed parts with a diameter of 4 m have to be accurate to 3/100 mm. In a very tough environment, this simply cannot be done using conventional methods.”
A solution from Leica Geosystems captured the imagination of the foundry staff. It offered a wireless probe, the Leica T-Probe, to measure even hidden points.
Operating comparable CMM systems demanded a lot of patience. A period of about 30 minutes per measurement was not long enough for the other systems, so the Leica Geosystems equipment earned much greater acceptance by the users. A laser tracker was installed, preconfigured for 6 DOF solutions; a Leica T-Probe is due to be added in the future. According to Tigges, the managers prefer to add to their metrology systems in stages.
Shortly after delivery of the system, an acceptance measurement was carried out. “Our craftsmen are accustomed to battling with tenths or hundredths of a millimeter, and are very experienced. They were curious; in their view the tracker had to prove itself first,” recalled Tigges. The acceptance measurements showed that the new tracker had fully achieved all the required accuracies.
Otto Junker department heads were trained to use the CMM system by Hexagon Metrology, starting with instruction in theoretical metrology and the PC-DMIS software, followed by some intensive practical simulations.
The greatest challenge for users is to verify their own measurements. “Small cones with diameters of 2.5 m and a height of 15 mm at an angle of 10° are very hard to capture. But with a half-inch reflector sphere we can achieve very reliable results. The graphical display in the software is a huge help,” said Tigges.
At the Otto Junker Foundry, measurement begins in the fabrication shop once the castings are unmolded after two or three days of solidification. It make take one to two weeks for a part to be ready for further processing.
The first step is rough measurement of dimensions, using a tape, and inspecting for casting defects to exclude undersizes. Then, the part is moved by crane to the turning mill. Every part is stressed differently and orientated to take into account incipient cracks. The first coarse of machining is carried out to within 3 mm of the final shape.
After this 20- to 50-hour process, the crane lowers the casting down from the turning mill. The part rests for several days to allow the strains in the material to be released, during which time component dimensions will change. As soon as the next process stage begins, the laser tracker comes into continuous use.
Thin-walled (20 mm) castings will move on the turning mill. Therefore, they have to be machined more than once and measurements have to be taken from both sides, and correlated. The casting will be re-measured in 0.5 mm steps until the specified dimensions are achieved.
When the part comes within 1.5 mm of the finished dimensions, it must be measured in cycles of three to four hours until the final dimensions are achieved. “In this way we can, and will in the future, work increasingly faster with the help of the Leica T-Probe,” said Tigges. “We have also discovered that we can only measure with great difficulty near the machine. The better option is to do it while the component is still mounted. We have so many crane and truck movements in the shop, so it is better if the tracker remains near the machine. Around the machine the floor plates are more stable and thicker.”
The laser tracker also alerted the team to other possible applications. The tracker was a great help when assembling a new turning mill, for example. “We measured the base for the machine where the table runs on an oil mat. These tracks have to be parallel to one another and are bedded by hand. Using the laser tracker, within a week and a half we had surveyed the tracks, and what we learned from the measurements led to significant savings in time and costs. The 63-metric ton table was quickly installed in the machine,” said Tigges. The tracker was also useful in checking the machine, too. Compensation had to be made for wear on the cutting tools. Precise measurement results can reveal the tolerances within which a machine is operating.
Now, Otto Junker has six workers who are trained to operate the system, and ready to share the technique with their colleagues. “Our highest priority is to keep production running,” concluded Tigges. “As we always have a component being processed, it is essential that the metrology system works 100%.”
