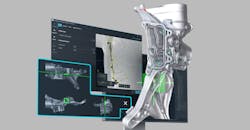
CT Scans with Porosity and Inclusion Analysis
HEXAGON’s new, version 2025.3 of Volume Graphics software incorporates the enhanced version of its Porosity & Inclusion analysis (PIA) tool that won an iF Award earlier this year. Many automotive, aerospace and other manufacturers that use CT-scan-data analysis for quality assurance are already frequent users of this tool.
Now, enhanced with AI, the PIA quickly pinpoints and identifies discrepancies—such as pores and inclusions deep within metal, plastic or composite parts, components or material samples—from early product development stages through final manufacturing.
“This is the first time our tool combines all previous methods into a single, powerful solution, from analysis to reporting,” stated Jan Gräser, product manager VG Product Line, Manufacturing Intelligence Division. “We’ve completely redesigned the user interface for this feature to make it easier for everyone—from beginners to experts—to employ the PIA to understand their results and conduct even the most complex analyses easily, accurately, and efficiently.”
The critical features in the Porosity & Inclusion Analysis include:
- Intuitive design: All important settings are immediately visible and summarized at a glance, while advanced options are clearly accessible on separate tabs.
- Efficient workflow: Fewer clicks, more overview, maximum control. For the first time, all porosity/inclusion analysis procedures have been brought together in a single solution. This allows for direct access to the core functions and eliminates the need to switch between different dialogs, saving valuable time.
- Easier navigation: The new preview in the analysis dialog combines all key information and makes navigation easier thanks to the interactive minimap that shows the user’s current position in the analysis window.
Other features in Hexagon’s 2025.3 VG software release include:
- Multipart coordinate measurement. This feature simplifies the handling of complex projects by allowing users to view, analyze, and edit measurement plans for multiple parts in one central location. The enhancement includes essential statistics for features directly in the feature list; interactive plotting of different values across all parts for individual features; and functions for directly editing, removing, and transferring features and geometry elements across all parts.
- Create and modify dimensions directly in the 3D view. With the “Dimensioning” dialog open, create and adjust dimensioning features by dragging and dropping the measurement lines directly in the 3D view, allowing for easy placement in the correct direction and optimal visibility. Additionally, by holding down the “Alt” key, you can create projected dimensions on a preview plane. This enhancement ensures that all lines remain both visible and adjustable, even when located inside the material.
- Improved deformation field capabilities for optical scans. This significant enhancement is specifically designed for complex morphing of incomplete optical scans. Optical scans can often be challenging in deformation field computation, including issues such as missing parts because of scanner limitations and the need for precise matching, particularly in one-sided scanning scenarios. This improvement allows for more accurate and comprehensive handling of complex optically scanned parts, ensuring precise alignment and analysis even under challenging conditions.
- Enhanced mesh import/export now supports GLB/GLTF, AMF, and 3MF file formats. This makes it easier to exchange 3D surface data with other applications. This allows users, for example, to directly import and use mesh data created for additive manufacturing and stored in AMF or 3MF formats as nominal reference data without the need to convert it to an intermediate format—or export colored meshes created from analysis results or extracted from volume objects in GLB format, which can be easily exchanged with other applications such as PowerPoint.
“Our goal with the redesigned Porosity & Inclusion Analysis feature, as well as others in version 2025.3, is to streamline the way our users work with our software, helping them make decisions about design and manufacturing parameters faster and more efficiently,” stated Dr. Daniela Handl, general manager VG, Manufacturing Intelligence Division.
“These robust capabilities will improve workflows and elevate the non-destructive evaluation process for a wide variety of manufacturers who employ 3D CT scanning for quality assurance.”
Learn more at www.volumegraphics.hexagon.com
